
Here is my findings about Google App Engine after I have spent 4 months to develop my Social App Happy Friday.
Pros:
1. It is FREE (until your app has tons of user)
2. It supports Java & JPA.
3. It supports scheduled task.
4. It has free Mail services so that you can notify your users.
5. It supports URL fetch.
6. It can be integrated with Facebook. (I've tried this before)
7. It supports Struts2. (I've tried this before)
Cons:
1. Its db is not relational, you have to learn some new idea such as BigTable, Google File System, Entity.
2. It does not support JOIN SQL.
3. It does not support predicate conditions on 2 different properties such as (..WHERE a > 10 and b < 10)
4. It does not support transaction across 2 different entities not in the same entity group.
5. It does not provide Java tool for data export and import.
6. It does not support function such as MAX, MIN, SUM, COUNT...
6. If you add primitive property to the entity, you cannot retrieve the old data, you have to delete it and add it again. There is no SQL for you to create or modify the entity.
7. It is not easy to implement Full Text Search on GAE.
2010年6月29日 星期二
2010年5月10日 星期一
Add Facebook Connect Button to your web site
This article describes how to add a Facebook Connect button to your web site.
I've implemented this function in the following demo site :
http://easyhangout.appspot.com/
The steps for adding "Facebook Connect Button" are as follows:
1. Apply a Facebook Developer account first by visiting this URL: http://www.facebook.com/developers/.
I will not repeat the details here since there are a lot of articles about this topic. For more details, pls visit this site.
2. Copy the xd_receiver.htm file to the root of your domain, this file will be called by Facebook and redirect the login session to your application.
<!DOCTYPE html PUBLIC "-//W3C//DTD XHTML 1.0 Strict//EN"
"http://www.w3.org/TR/xhtml1/DTD/xhtml1-strict.dtd">
<html xmlns="http://www.w3.org/1999/xhtml" >
<head>
<title>Cross-Domain Receiver Page</title>
</head>
<body>
<script src="http://static.ak.connect.facebook.com/js/api_lib/v0.4/XdCommReceiver.js?v2" type="text/javascript"></script>
</body>
</html>
3. Change the HTML tag of your login page:
<html xmlns="http://www.w3.org/1999/xhtml" xmlns:fb="http://www.facebook.com/2008/fbml">
4. Add the following javascript in your login page:
<body>
....
<script src="http://static.ak.connect.facebook.com/js/api_lib/v0.4/FeatureLoader.js.php" type="text/javascript">
</script>
<fb:login-button onlogin='window.location="/YOUR_SERVLET?para=1";' length="long" ></fb:login-button>
<script type="text/javascript">
FB.init("YOUR_API_KEY", "xd_receiver.htm");
</script>
....
</body>
5. This step is very important, you have to define the Base Domain in the Facebook Application Setting, otherwise, the event "onlogin" of the Connect Button will not be triggered and the popup Login form will NOT be closed.
For example, if your app URL is :
http://abc.appspot.com/ABCServlet?para=1
then, the Base Domain is :
abc.appspot.com

6. Now, when the user click the Connect Button, a login form will pop up and the user will input name and password. If successful, the login form will be closed and your application servlet will be called.

There will be an authentication token generated and you can retrieve it from the HttpServletRequest object:
String token = request.getParameter("auth_token");
After you have received the token, you can use a Facebook REST library to call the Facebook platform API and I will not repeat the details here.
To download the library, you can goto:
http://code.google.com/p/facebook-java-api/
2010年2月11日 星期四
Align More Than One Text Field In A Single Row for Struts2
If you are using table tag and want to align more than 1 Text Field in a single row for Struts2, you have to add theme="simple" in the tag, otherwise, a tag is automatically generated for each s:textfield and s:label tags.
2010年1月6日 星期三
Android plugin for NetBeans 6.7.1
To develop an Android Program using Netbeans 6.7.1, you have to download and install a lot of stuff at the beginning. I assume that your Netbeans is working properly, so let's follow the steps below:
1. In Netbeans, goto Tools->Plugin, choose Settings tab, then click Add button.
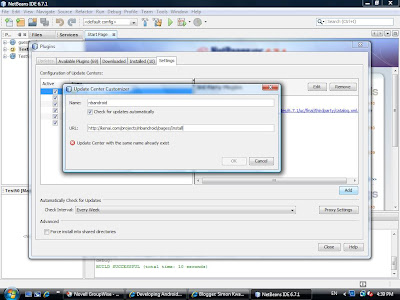
2. A dialog is shown, type http://kenai.com/projects/nbandroid/pages/Install in the URL textfield.
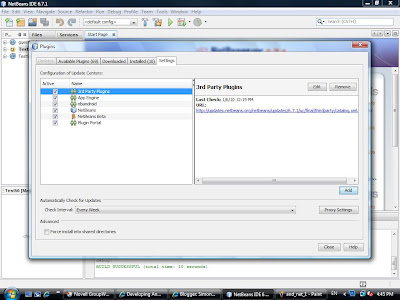
3. A new Update Center is added.
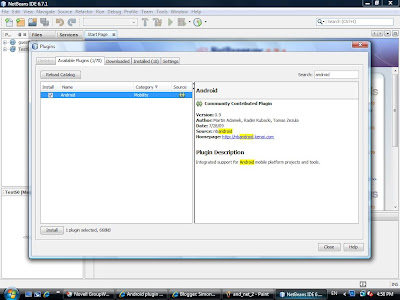
4. Goto Available Plugins tab, type "android" in the Search field, check Android plugin and press Install button.

11. Goto Available Packages, then select the target platform and click Install Selected button.
12. Finally, goto Virtual Devices, click New button and create a virtual device.
13. In Netbeans, goto Tools->Java Platforms, then click Add Platform...
14. Select Google Android and then click Next button. Then select the target platform.
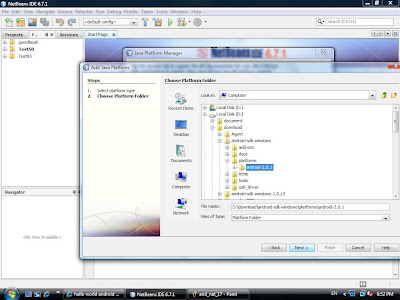

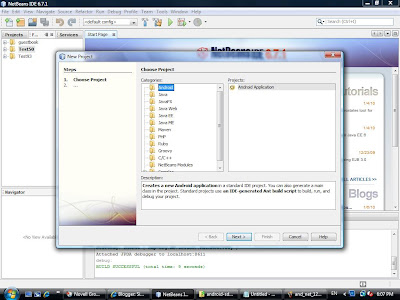
15. Click Finish button. You are now ready to create an Android Project.
In Netbeans, goto File->New Porject and select Android project, then a new project is created.
16. Add the following code in your MainActivity.java for testing:
import android.app.Activity;
import android.os.Bundle;
import android.widget.TextView;
public class MainActivity extends Activity {
@Override
public void onCreate(Bundle icicle) {
super.onCreate(icicle);
TextView tv = new TextView(this);
tv.setText("Hello, Android!");
setContentView(tv);
}
}
17. You can set break point in your code. Then, goto Debug->Debug Main Project to debug the program.
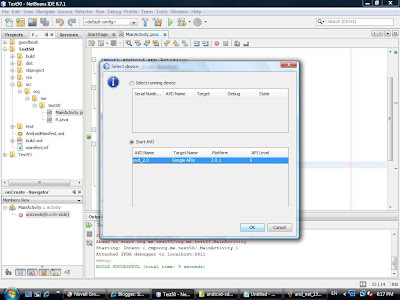
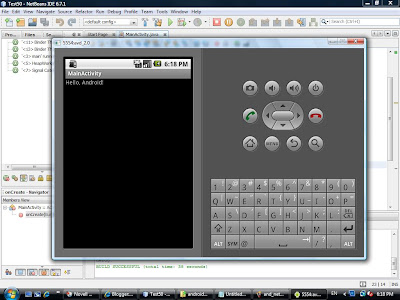
18. You have to wait for a few minutes when the emulator starts running.
Click the emulator's menu button, then you can see that the program is running.
Tip: You need not to close the emulator when you finish the debugger session, just keep it running all the time.
By Simon Kwan
A Developer of Facebook Application Happy Friday
1. In Netbeans, goto Tools->Plugin, choose Settings tab, then click Add button.

2. A dialog is shown, type http://kenai.com/projects/nbandroid/pages/Install in the URL textfield.
3. A new Update Center is added.

4. Goto Available Plugins tab, type "android" in the Search field, check Android plugin and press Install button.

5. Click Next button.
6. Click Install button.
7. Click Continue and then Finish finally. This finish the steps of installing Netbeans plugin.

8. Then, download the Android SDK from the following URL http://developer.android.com/sdk/index.html
Choose android-sdk_r04-windows.zip to download if you are using Windows OS.
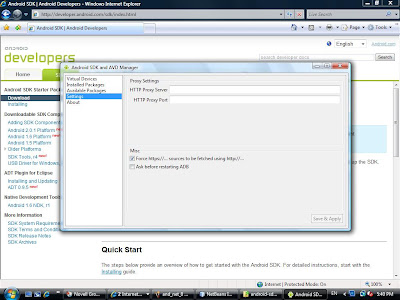
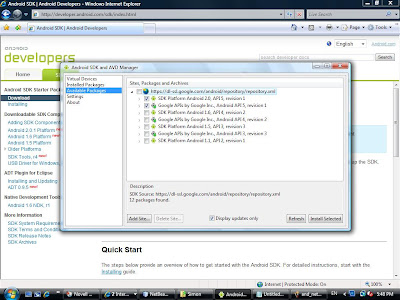
9. Unzip the SDK and install in any folder you like. Then run the SDK Setup program to install additional platform component. You may encounter the following error when the program is executed, then goto step 10 to fix this problem.

10. Select Settings, check "Force https://...sources/ to be fetched using http://..." and then click Save & Apply button.

11. Goto Available Packages, then select the target platform and click Install Selected button.

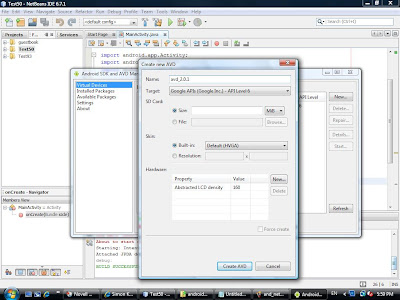
12. Finally, goto Virtual Devices, click New button and create a virtual device.

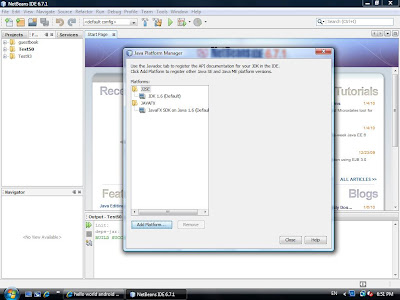
13. In Netbeans, goto Tools->Java Platforms, then click Add Platform...

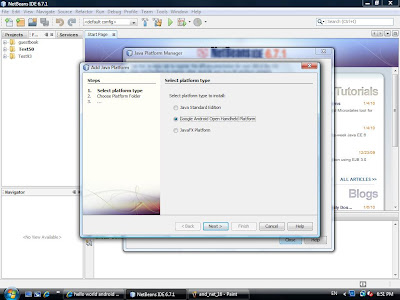
14. Select Google Android and then click Next button. Then select the target platform.


15. Click Finish button. You are now ready to create an Android Project.
In Netbeans, goto File->New Porject and select Android project, then a new project is created.

16. Add the following code in your MainActivity.java for testing:
import android.app.Activity;
import android.os.Bundle;
import android.widget.TextView;
public class MainActivity extends Activity {
@Override
public void onCreate(Bundle icicle) {
super.onCreate(icicle);
TextView tv = new TextView(this);
tv.setText("Hello, Android!");
setContentView(tv);
}
}
17. You can set break point in your code. Then, goto Debug->Debug Main Project to debug the program.

18. You have to wait for a few minutes when the emulator starts running.
Click the emulator's menu button, then you can see that the program is running.
Tip: You need not to close the emulator when you finish the debugger session, just keep it running all the time.

By Simon Kwan
A Developer of Facebook Application Happy Friday
2009年12月8日 星期二
Precomputed method for soft shadow generation under dynamic scene
Abstract
Many applications in computer graphics and related fields can benefit from shadow rendering. Shadow is an important element in creating realistic image and in providing the user with visual cues about object placement. In this paper, I will present a new precomputed method for soft shadow generation under dynamic scene. The basic idea, inspired by Shadow Field technique, is to precompute the visibility function of an occluder under viewing direction and distance. Then, the function data will be compressed using PCA method and stored in lookup textures. My technique is easy to implement and enables all-frequency shadow effects in dynamic scenes under high interactive rate.
1. Introduction
In computer graphics, shadow is an important element of producing realistic image. Many applications in computer graphics and related fields such as virtual reality can benefit from shadow rendering. Without some shadow as a visual cue, scene are often unconvincing and more difficult to perceive. It is usually better to have an inaccurate shadow than no shadow at all.There are two types of shadows: self-shadow and cast shadow. Self-shadow is one formed when the shadow of the occluder is projected on itself, in other words, the occluder and receiver are the same. Cast shadow is one formed when the shadow is projected on another object. Light source can be modeled as a point or an area having finite size. Point light source generates hard shadow that is a fully shadowed region. Area light source generates soft shadow that has fully shadowed region called umbra and partially shadowed region called penumbra. (See figure 4)
There are many techniques to generate self-shadow such as Precomputed Radiance Transfer (PRT). The technique presented in this paper will only generate cast shadow but can be used with PRT method together to generate self-shadow. Also, it is assumed that a moveable spherical light source will be used as the area light source.
2. Related work
Soft shadow techniques are generally based on combining multiple shadow maps (e.g., [Heckbert and Herf 1997; Agrawala et al. 2000]), extending shadow volumes (e.g.,[Assarsson andAkenine-Moller2003]) and using Pre-computed Radiance Transfer (PRT).
For a dynamic scene, shadow map and volume computation escalates significantly with greater scene complexity and needs to be repeated for each frame. This rendering load cannot be alleviated by pre-computation, since shadow maps and volumes are determined with respect to a specific arrangement of lights and occluders, for which there exists numerous possible configurations.
A radiosity-based approach [Drettakis and Sillion 1997] has been presented for rendering soft shadows and global illumination by identifying changes in hierarchical cluster links as an object moves. With this technique, the corresponding changes in only coarse shadows have been demonstrated at interactive rates, and it is unclear how to handle multiple moving objects that may affect the appearance of one another.
PRT for Static Scenes: PRT provides a means to efficiently render global illumination effects such as soft shadows and inter-reflections from an object onto itself. Most PRT algorithms facilitate evaluation of the shading integral by computing a double product between BRDF and transferred lighting that incorporates visibility and global illumination [Sloan et al.2002;Kautz et al.2002;Lehtinen and Kautz 2003] or between direct environment lighting and a transport function that combines visibility and BRDF[Ng et al.2003]. Instead of employing double product integral approximations, Ng et al. [2004] propose an efficient triple product wavelet algorithm in which lighting, visibility, and reflectance properties are separately represented, allowing high resolution lighting effects with view variations.
PRT for Dynamic Scenes: The idea of sampling occlusion information around an object was first presented by Ouhyoung et al. [1996], and later for scenes with moving objects, Mei et al.[2004] efficiently rendered shadows using pre-computed visibility information for each object with respect to uniformly sampled directions. By assuming parallel lighting from distant illuminants, some degree of shadow map pre-computation becomes manageable for environment maps. For dynamic local light sources, however, pre-computation of shadow maps nevertheless remains infeasible.
Sloan et al. [2002] present a neighborhood-transfer technique that records the soft shadows and reflections cast from an object onto surrounding points in the environment. However, it is unclear how neighborhood-transfers from multiple objects can be combined.
Shadow fields [Zhou et al. 2005] extend the idea of Ng et al. [2004] method to account for dynamic visibility changes by rotating each blocker visibility function into the local coordinate frame and computing the SH product over all blockers. SH rotations and products are very expensive, precluding GPU implementation and restricting real-time CPU implementation to a few pre-computed blockers.
PRT methods for deformable objects have suggested partial solutions for dynamic lighting. James and Fatahaltian [2003] compute and interpolate transfer vectors for several key frames of given animations, and render the pre-animated models under environment maps in real time. This method, however, does not generalize well to dynamic scenes that contain moving local light sources and numerous degrees of freedom. Kautz et al. [2004] propose a hemispherical rasterizer that computes the self-visibility for each vertex on the fly; however, this approach would incur heavy rendering costs for a complex scene containing many objects.
3. Algorithm
3.1 Precomputed visibility function
For each occluder, we first compute the visibility of the light source under different viewpoints. The visibility function will have 6 parameters and is defined as below:
visibility(a, b, c, d, e, f) = solid angle subtended by visible part of light source / solid angle subtended by light source
a -- longitude angle of the viewpoint in occluder local frame
b -- colatitude angle of the viewpoint in occluder local frame
c -- distance of viewpoint in occluder local frame
d -- angle between view direction and light direction
e -- rotation angle of light direction
f -- apex angle subtended by the light source
For the ratio calculation of the 2 solid angles, it will be approximated by using a uniform distribution of light ray from the viewpoint to the light source. Also, we assumed that the apex angle is small and can be considered as a user defined constant. So, the approximate visibility function will have 5 parameters and is defined as below:
visibility(a, b, c, d, e) = no. of visible light ray / no. of light ray
a -- longitude angle of the viewpoint in occluder local frame with range [0, 2pi)
b -- colatitude angle of the viewpoint in occluder local frame with range [0, pi]
c -- distance of viewpoint in occluder local frame with range [dp, infinity)
d -- angle between view direction and light direction with range [0, pi/2]
e -- rotation angle of light direction with range [0, 2pi)
Since we will use texture file to store the data, normalized parameters u, v, w, x, y with the following formulas have to be used:
u = a / 2*pi
v = b / pi
w = (c - dp)/(c - dp + 1)
x = 2 * d / pi
y = e / 2*pi
3.2 Compression of visibility function
To be continued..
2009年11月25日 星期三
Free online book for DX10 Shader programming
Programming Vertex, Geometry, and Pixel Shaders:
http://wiki.gamedev.net/index.php/D3DBook:Book_Cover
This book is intended for people that have some background in DirectX8 or DirectX9 programming and want to upgrade their knowledge to DirectX 10.
http://wiki.gamedev.net/index.php/D3DBook:Book_Cover
This book is intended for people that have some background in DirectX8 or DirectX9 programming and want to upgrade their knowledge to DirectX 10.
2009年11月18日 星期三
ASSIMP - Skeletal Animation Library
Today, I come across a Skeletal Animation library which is called ASSIMP.
http://assimp.sourceforge.net/lib_html/index.html
It looks pretty powerful, it can import a lot of file format such as COLLADA, 3DS, .X..etc.
It has no rendering part, so it is quite flexible and can be integrated to your game engine.
I am now studying how to use it so that my game engine can have skeletal animation feature.
訂閱:
意見 (Atom)