
Here is my findings about Google App Engine after I have spent 4 months to develop my Social App Happy Friday.
Pros:
1. It is FREE (until your app has tons of user)
2. It supports Java & JPA.
3. It supports scheduled task.
4. It has free Mail services so that you can notify your users.
5. It supports URL fetch.
6. It can be integrated with Facebook. (I've tried this before)
7. It supports Struts2. (I've tried this before)
Cons:
1. Its db is not relational, you have to learn some new idea such as BigTable, Google File System, Entity.
2. It does not support JOIN SQL.
3. It does not support predicate conditions on 2 different properties such as (..WHERE a > 10 and b < 10)
4. It does not support transaction across 2 different entities not in the same entity group.
5. It does not provide Java tool for data export and import.
6. It does not support function such as MAX, MIN, SUM, COUNT...
6. If you add primitive property to the entity, you cannot retrieve the old data, you have to delete it and add it again. There is no SQL for you to create or modify the entity.
7. It is not easy to implement Full Text Search on GAE.
2010年6月29日 星期二
2010年5月10日 星期一
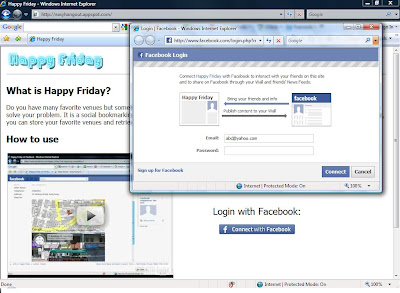
Add Facebook Connect Button to your web site
This article describes how to add a Facebook Connect button to your web site.
I've implemented this function in the following demo site :
http://easyhangout.appspot.com/
The steps for adding "Facebook Connect Button" are as follows:
1. Apply a Facebook Developer account first by visiting this URL: http://www.facebook.com/developers/.
I will not repeat the details here since there are a lot of articles about this topic. For more details, pls visit this site.
2. Copy the xd_receiver.htm file to the root of your domain, this file will be called by Facebook and redirect the login session to your application.
<!DOCTYPE html PUBLIC "-//W3C//DTD XHTML 1.0 Strict//EN"
"http://www.w3.org/TR/xhtml1/DTD/xhtml1-strict.dtd">
<html xmlns="http://www.w3.org/1999/xhtml" >
<head>
<title>Cross-Domain Receiver Page</title>
</head>
<body>
<script src="http://static.ak.connect.facebook.com/js/api_lib/v0.4/XdCommReceiver.js?v2" type="text/javascript"></script>
</body>
</html>
3. Change the HTML tag of your login page:
<html xmlns="http://www.w3.org/1999/xhtml" xmlns:fb="http://www.facebook.com/2008/fbml">
4. Add the following javascript in your login page:
<body>
....
<script src="http://static.ak.connect.facebook.com/js/api_lib/v0.4/FeatureLoader.js.php" type="text/javascript">
</script>
<fb:login-button onlogin='window.location="/YOUR_SERVLET?para=1";' length="long" ></fb:login-button>
<script type="text/javascript">
FB.init("YOUR_API_KEY", "xd_receiver.htm");
</script>
....
</body>
5. This step is very important, you have to define the Base Domain in the Facebook Application Setting, otherwise, the event "onlogin" of the Connect Button will not be triggered and the popup Login form will NOT be closed.
For example, if your app URL is :
http://abc.appspot.com/ABCServlet?para=1
then, the Base Domain is :
abc.appspot.com

6. Now, when the user click the Connect Button, a login form will pop up and the user will input name and password. If successful, the login form will be closed and your application servlet will be called.
There will be an authentication token generated and you can retrieve it from the HttpServletRequest object:
String token = request.getParameter("auth_token");
After you have received the token, you can use a Facebook REST library to call the Facebook platform API and I will not repeat the details here.
To download the library, you can goto:
http://code.google.com/p/facebook-java-api/
I've implemented this function in the following demo site :
http://easyhangout.appspot.com/
The steps for adding "Facebook Connect Button" are as follows:
1. Apply a Facebook Developer account first by visiting this URL: http://www.facebook.com/developers/.
I will not repeat the details here since there are a lot of articles about this topic. For more details, pls visit this site.
2. Copy the xd_receiver.htm file to the root of your domain, this file will be called by Facebook and redirect the login session to your application.
<!DOCTYPE html PUBLIC "-//W3C//DTD XHTML 1.0 Strict//EN"
"http://www.w3.org/TR/xhtml1/DTD/xhtml1-strict.dtd">
<html xmlns="http://www.w3.org/1999/xhtml" >
<head>
<title>Cross-Domain Receiver Page</title>
</head>
<body>
<script src="http://static.ak.connect.facebook.com/js/api_lib/v0.4/XdCommReceiver.js?v2" type="text/javascript"></script>
</body>
</html>
3. Change the HTML tag of your login page:
<html xmlns="http://www.w3.org/1999/xhtml" xmlns:fb="http://www.facebook.com/2008/fbml">
4. Add the following javascript in your login page:
<body>
....
<script src="http://static.ak.connect.facebook.com/js/api_lib/v0.4/FeatureLoader.js.php" type="text/javascript">
</script>
<fb:login-button onlogin='window.location="/YOUR_SERVLET?para=1";' length="long" ></fb:login-button>
<script type="text/javascript">
FB.init("YOUR_API_KEY", "xd_receiver.htm");
</script>
....
</body>
5. This step is very important, you have to define the Base Domain in the Facebook Application Setting, otherwise, the event "onlogin" of the Connect Button will not be triggered and the popup Login form will NOT be closed.
For example, if your app URL is :
http://abc.appspot.com/ABCServlet?para=1
then, the Base Domain is :
abc.appspot.com

6. Now, when the user click the Connect Button, a login form will pop up and the user will input name and password. If successful, the login form will be closed and your application servlet will be called.

There will be an authentication token generated and you can retrieve it from the HttpServletRequest object:
String token = request.getParameter("auth_token");
After you have received the token, you can use a Facebook REST library to call the Facebook platform API and I will not repeat the details here.
To download the library, you can goto:
http://code.google.com/p/facebook-java-api/
2010年2月11日 星期四
Align More Than One Text Field In A Single Row for Struts2
If you are using table tag and want to align more than 1 Text Field in a single row for Struts2, you have to add theme="simple" in the tag, otherwise, a tag is automatically generated for each s:textfield and s:label tags.
2010年1月6日 星期三
Android plugin for NetBeans 6.7.1
To develop an Android Program using Netbeans 6.7.1, you have to download and install a lot of stuff at the beginning. I assume that your Netbeans is working properly, so let's follow the steps below:
1. In Netbeans, goto Tools->Plugin, choose Settings tab, then click Add button.
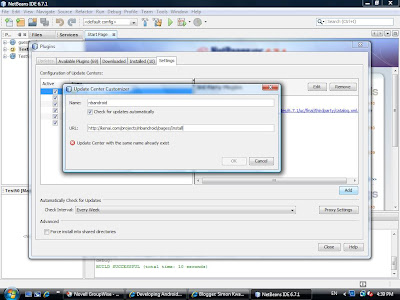
2. A dialog is shown, type http://kenai.com/projects/nbandroid/pages/Install in the URL textfield.
3. A new Update Center is added.
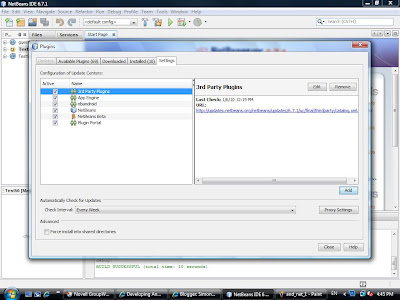
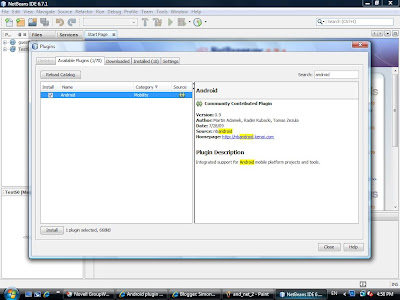
4. Goto Available Plugins tab, type "android" in the Search field, check Android plugin and press Install button.

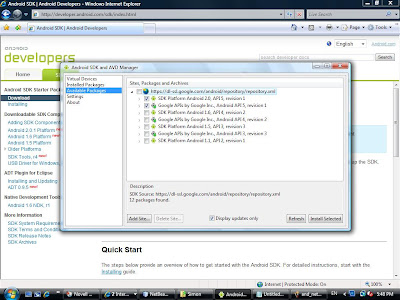
11. Goto Available Packages, then select the target platform and click Install Selected button.
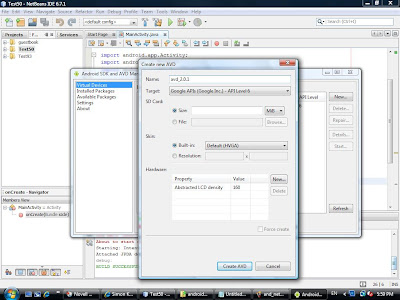
12. Finally, goto Virtual Devices, click New button and create a virtual device.
13. In Netbeans, goto Tools->Java Platforms, then click Add Platform...
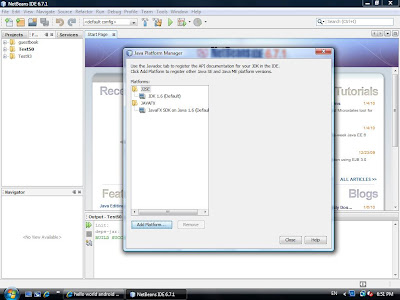
14. Select Google Android and then click Next button. Then select the target platform.
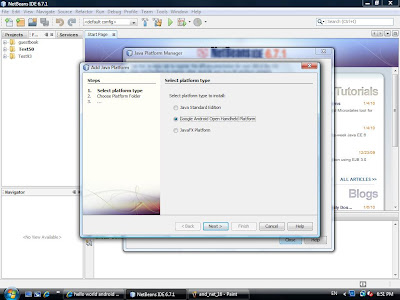
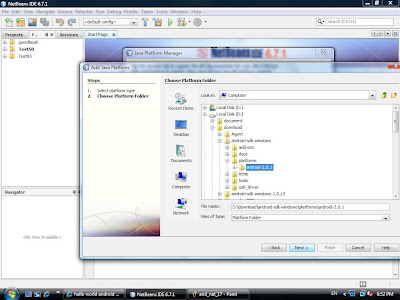

15. Click Finish button. You are now ready to create an Android Project.
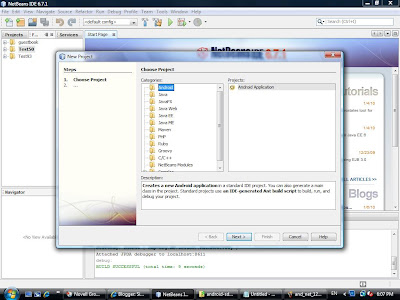
In Netbeans, goto File->New Porject and select Android project, then a new project is created.
16. Add the following code in your MainActivity.java for testing:
import android.app.Activity;
import android.os.Bundle;
import android.widget.TextView;
public class MainActivity extends Activity {
@Override
public void onCreate(Bundle icicle) {
super.onCreate(icicle);
TextView tv = new TextView(this);
tv.setText("Hello, Android!");
setContentView(tv);
}
}
17. You can set break point in your code. Then, goto Debug->Debug Main Project to debug the program.
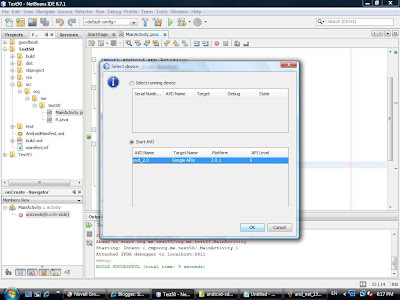
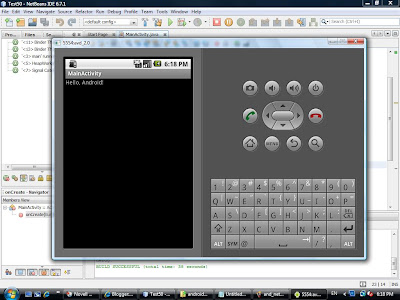
18. You have to wait for a few minutes when the emulator starts running.
Click the emulator's menu button, then you can see that the program is running.
Tip: You need not to close the emulator when you finish the debugger session, just keep it running all the time.
By Simon Kwan
A Developer of Facebook Application Happy Friday
1. In Netbeans, goto Tools->Plugin, choose Settings tab, then click Add button.

2. A dialog is shown, type http://kenai.com/projects/nbandroid/pages/Install in the URL textfield.
3. A new Update Center is added.

4. Goto Available Plugins tab, type "android" in the Search field, check Android plugin and press Install button.

5. Click Next button.
6. Click Install button.
7. Click Continue and then Finish finally. This finish the steps of installing Netbeans plugin.

8. Then, download the Android SDK from the following URL http://developer.android.com/sdk/index.html
Choose android-sdk_r04-windows.zip to download if you are using Windows OS.
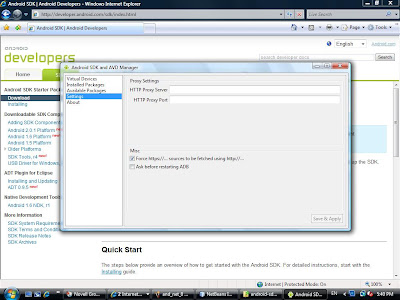
9. Unzip the SDK and install in any folder you like. Then run the SDK Setup program to install additional platform component. You may encounter the following error when the program is executed, then goto step 10 to fix this problem.

10. Select Settings, check "Force https://...sources/ to be fetched using http://..." and then click Save & Apply button.

11. Goto Available Packages, then select the target platform and click Install Selected button.

12. Finally, goto Virtual Devices, click New button and create a virtual device.

13. In Netbeans, goto Tools->Java Platforms, then click Add Platform...

14. Select Google Android and then click Next button. Then select the target platform.


15. Click Finish button. You are now ready to create an Android Project.
In Netbeans, goto File->New Porject and select Android project, then a new project is created.

16. Add the following code in your MainActivity.java for testing:
import android.app.Activity;
import android.os.Bundle;
import android.widget.TextView;
public class MainActivity extends Activity {
@Override
public void onCreate(Bundle icicle) {
super.onCreate(icicle);
TextView tv = new TextView(this);
tv.setText("Hello, Android!");
setContentView(tv);
}
}
17. You can set break point in your code. Then, goto Debug->Debug Main Project to debug the program.

18. You have to wait for a few minutes when the emulator starts running.
Click the emulator's menu button, then you can see that the program is running.
Tip: You need not to close the emulator when you finish the debugger session, just keep it running all the time.

By Simon Kwan
A Developer of Facebook Application Happy Friday
訂閱:
文章 (Atom)